Quick Draw iPhone tricks

Photo by author.
Back in the day, during the 70’s photo craze, every shiny new 35mm SLR and rangefinder came with a camera case. The more expensive ones were real leather with the camera brand debossed on the front.
They were called “eveready” cases.
The things came in 2 pieces, one to secure and protect the base of the camera body and a second piece that covered the lens and top of the body. By unsnapping the top piece you could take shots with the cover dangling beneath the camera and then flip it back in place until the next shot presented itself.
As if that wasn’t awkward enough, you had to remove the bottom piece whenever you needed to change film.
Serious photographers called them “neveready” cases, and your level of commitment to photography was measured by whether you used the bottom part of the case alone - so at least you were ready for the pop-up shot - or you went bareback with no case at all.

Photo by author.
These days, iPhones have neveready issues of their own. Locked screens. Finding the camera app. Taking a video when you want a photo.
We’ve replaced the obstacle of leather cases with a maze of software navigation.
On top of that, the pop-up opportunities for photos have multiplied just because our iPhones are always with us in ways that those film SLR’s never were. And their small size makes them perfect for candid and street photography.
So how do you master the iPhone quick draw? Getting the shot before it’s gone? Grabbing the “decisive moment” that defined photographer Henri Cartier-Bresson’s renowned career.
When you sense that pregnant opportunity or see a split second moment that begs to be captured, how do you get your iPhone out and set up before the moment is gone?
The Lock Screen Bypass
For some time now, the iPhone Lock Screen has had a shortcut button that takes you directly into the Camera App. You can’t get anywhere else unless you have Face Recognition on, so it’s fine to let the waiter take your group photo without exposing sensitive data. Think of it like your car’s valet key that lets her park it in the back lot, but can’t open the trunk with all your goodies.
The thing is that sometimes I can press that shortcut button 5 or 6 times before it works. Maybe it’s just me. Or sunscreen. Or impatience. Whatever. But the fact remains that I’ve lost more than one photo opportunity that way.
Your mileage may vary.
However, there’s a camera shortcut I’ve come to love that’s even better.
All you have to do in the Lock Screen is swipe the whole screen to the left and, voila, you are in the Camera App! The ultimate quickie lock screen bypass to grab that shot.

Swipe left in Lock Screen to go directly to camera app.
And, speaking of waiters, if someone hands you their iPhone to get a group, the swipe works just fine for you too. No need to hand it back for the owner to unlock and rummage around for the Camera App. You’ve got this.
The Double Tap Express
But what if you’re hip deep in your Instagram Stories, are about 6 screens away from your Camera App, and haven’t closed out of any Apps in the app switcher for 3 months?
Suddenly, Argyle takes their first step.
Now you wish you were back at the Lock Screen, right?
Well, with a little pre-planning you can finesse this one too.
When you go to the Accessibility setup in Settings > Accessibility > Touch, you will find a feature called Back Tap. When you turn that on you can choose to have a Double (or Triple) Tap launch the Camera App. Then, no matter where you are or what you’re doing, a (firm) double-tap on the back of your iPhone will launch the Camera App. It’s like having a FASTPASS at DisneyLand. Go to the front of the line.

In the accessibility settings on iPhone.
Speed Settings
One more thing.
Getting quick access to the Camera App is nifty, but the app offers 7 different modes, from Time-Lapse to Panorama. By default the Camera App will reset itself to Photo with Live Photo turned on, but if you really want to wow the grandparents with Argyle’s first steps, you may prefer Video. Or Slo-Mo. Either way, you have to change the camera setup to your mode of choice and doing that takes a couple more precious seconds.

Swipe anywhere to change camera mode.
For years I fumbled with the mode labels across the bottom of the screen to do that. Then I found that you can swipe left or right pretty much anywhere in the App to change the mode. It’s easy and quick. No tiny labels to hit.
Mr. Peabody’s Wayback Machine
The only thing better than anticipating a photo opportunity is to get a second chance. That’s what Live Photo does.
With Live Photo turned on, the Camera App is always recording. When you take a shot the app keeps 1.5 seconds of images before you tapped the button and another 1.5 seconds after. So if you are too slow getting set up and taking a picture, there’s a chance your Live Photo will have a better frame of the moment just before you snapped. Like Mr. Peabody’s Wayback Machine, you can revisit a snippet of history and see what happened.
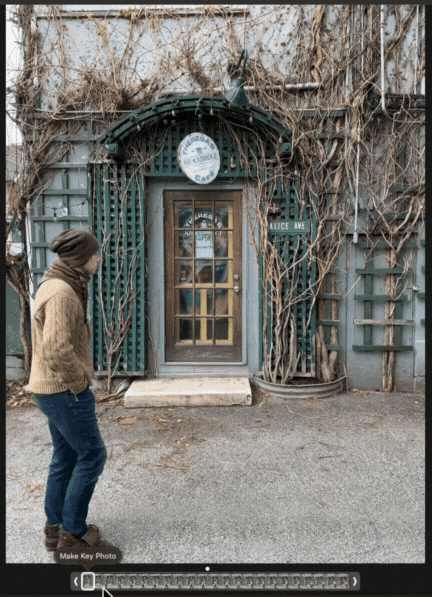
All the shots you have to choose from.
It’s amazing how much can go on in 1.5 seconds. When you go to Edit the picture, you can select an earlier frame in the sequence and make it the Key Photo. This only works for Live Photos, of course, but it’s a handy feature if there’s a lot of activity and you are always too slow to catch that decisive moment.
Learn to be comfortable with these 4 tricks and I bet you’ll get photos you used to miss. The iPhone lets us have a decent camera with us every great moment of the day and developing your quick draw technique will save them forever.